Wow, I'm baking again. Must be something in the air around here.
One thing I make well is apple pie. I love apple pie. I adore apple pie. I think apple pie is the quintessential dessert. So I'd better be able to make a decent apple pie.

I started off the morning with the pie crust. This is a recipe from the Better Homes and Gardens New Cook Book that I received as a wedding present almost 26 years ago. Knowing that I wanted to make a pie with a top crust, I doubled the amounts for the pie crust. If you want to make a single pie crust, just halve the amounts.
Here I have 2-1/2 cups flour, 1 teaspoon salt, 2/3 cup shortening and cold water. Since my water/ice dispenser is broken on my refrigerator, I added ice to tap water to ensure that the water would be cold.
 The first step is to thoroughly blend the flour and salt. Add the shortening and using either a pastry cutter or a couple of knives, cut in until the shortening is about pea-size.
 Now, switch to a fork and stir in the cold water, a tablespoon at a time. The weather and how dry the flour is will determine how much water will be needed. You want the dough to just begin to hold together. Usually, 6 to 8 tablespoons will be required. Maybe more, maybe less.
 At this point the dough is still somewhat dry, but is not sticky. This is good.
 Press the dough into a ball and wrap in plastic. Place in the refrigerator for at least 30 minutes to allow the moisture to saturate the flour and for the dough to rest.
 It's time to consider the filling. I found a recipe from William-Sonoma that I decided to try.
I have Ambrosia apples, Honeycrisp apples and some no-name apple. I also have corn starch, whole nutmeg, salt, ground cinnamon, lemon, granulated sugar and brown sugar.
 It never fails: the first apple that goes through the corer/slicer/parer is mangled. I use this machine a couple of times a year and each time I have to get out the screwdriver and tighten or loosen a screw. As a 'nice' bonus this time, I sliced open my finger as I was trying to manually feed the apple through the thing. Ouch! Off to find a bandage.
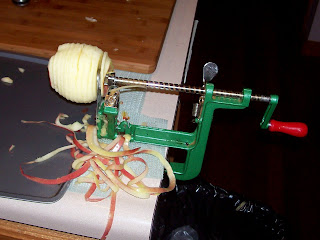 Okay, I'm back and now the machine is working as it should.
 I will never go back to buying ground nutmeg. The jarred ground nutmeg is like sawdust. This stuff? Aromatic and bursting with flavor.
 The recipe says to heat the apples and everything but the lemon in a covered, heavy pan over medium heat for about 20 minutes. Then remove the lid and cook for another 5 to 7 minutes.
 This almost smells good enough to eat without the pie!
 Squeeze the lemon over the apples.
 Let's roll out some pie crust. This old rolling pin is getting a lot of use this week. I split off roughly a third of the dough for the top crust and set that aside for now.
 This looks like it's big enough for the pie pan.
 Here's a little trick for you. To minimize tears and to avoid stretching the dough, loosely wrap the dough over the rolling pin and lift it to the pan.
 Trim off the extra dough.
 Add the filling.
 My daughter wanted me to do a decorative top for the pie. I dug into the cabinets to see if I still had this apple cut-out form. I bought this thing over 20 years ago. Press down to cut the apple shapes out of the dough. Since the round was the same size as the pie pan, I trimmed around the form to get the top. Carefully pick out the apple cut-outs and set aside.
 Crimp the edges together. Brush an egg-white wash over the top of the pie crust and add some of the apple shapes if desired.
  Cut the butter into 1/2-inch cubes and place on the pie. Sprinkle granulated sugar on top. Bake in a preheated 400 degree oven for one hour.
 The daughter was kind enough to start baking this while I drove into town to deliver the cheese balls to the extension office. Yes, I was also making the cheese balls at the same time I had been preparing the pie. And making dinner. Just call me a multi-tasking fool.
 Now comes the hard part: waiting for the pie to cool before eating it.


1 comment:
Looks delicious!
Post a Comment