Showing posts with label honey and vanilla pound cake. Show all posts

Tuesday, October 11, 2011

Two More Tailgates or Wish You Were Here

Indiana University may not be winning lately,
but they have not been visiting our tailgate, either.
Coincidence?
I think not.


A couple of weeks ago we had our breakfast tailgate.
We prepared Honey Vanilla Poundcake
with berry glaze.

I used Ina Garten's recipe for the pound cake.
Since it can be difficult to find extra-large eggs,
I suggest using large eggs, but adding one extra egg
to compensate.


Do as I say and not as I do.
Follow the directions and take the pound cake out 
after 60 minutes, max.
I hesitated, based upon reviewer complaints 
and left it in for 70 minutes.
It was too well-done.

One cannot determine if a pound cake is done by using a tester.
It will always come out gooey with batter.

Pound cake is a dense cake,
a gooey cake,
not a fluffy cake.

The Foodie Daughter made the berry glaze.


I had also made my world famous 

Hearts soared,
crowds cheered
and the Hoosiers still lost.

Guess they should have come to the tailgate.
Coach Wilson, are you listening?
From one Miami alumnus to another...
Miami something, er assistant head coach,
just saying.


Breakfast burritos, courtesy one of our tailgate chums.


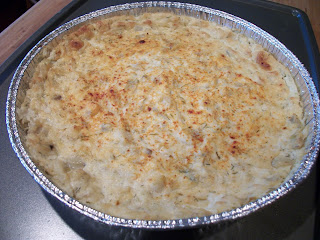
I recently had a dip at a Master Gardener meeting
that I just had to get the recipe for.

Artichoke Dip

1 cup mayonnaise (do not use light mayo)
1 8-ounce block cream cheese
1 cup grated Parmesan cheese
1 teaspoon dill
1 garlic clove, grated
1 teaspoon Worcestershire sauce
1 15-ounce can artichoke hearts

Not shown: paprika


Either in a food processor or with a mixer,
blend together the cream cheese,
mayonnaise, Parmesan, dill, garlic and 
Worcestershire sauce.

Chop the artichoke hearts as finely as desired.
Warning: with some brands it will be necessary
to remove the choke from the artichokes
before chopping.

Stir in the chopped artichokes.


Spread into a 8" round or square baking pan.

Sprinkle with paprika.

Bake at 350 degrees for 30 to 35 minutes,
or until bubbly and a little brown.


Serve with crackers or on sliced French bread
or another sturdy bread.


Fast forward a week and we find that our spot has
been usurped by Habitat for Humanity.

That tree is our usual spot and if we had set up the
tent there,
then our tailgate neighbors would not have had room to set up.
So we moved over so they would have room.


The tables are set with food.
This week it is a seafood extravaganza
complete with our offerings of
shrimp rolls,
krab bites
and artichoke dip.
Our friends brought 
crab rangoon,
spicy shrimp,
teriyaki shrimp,
cheesy meatballs
and gravy and biscuits.


Our tailgate neighbors had to set up closer to the street.


They were serving up breakfast sandwiches,
with over easy eggs, fried spam and bologna
with fried crispy crowns (think flat tater tots) on top.

They generously offered me a sandwich.
Delicious and filling.

They were also serving up jambalaya,
fried chicken wings, jalapeno poppers
and marinated pork sandwiches.

I hear the jambalaya was good,
but as it had chicken in it, I had to pass.


Fabian Seafood visited town again this week
so I purchased more shrimp.
Lovely shrimp for this delicious and different recipe.

Shrimp Rolls

1 small lemon
2 tablespoons sweet chili aioli*
2 tablespoons mayonnaise
2 tablespoons red onion, chopped
1 pound shrimp, sauteed and chopped
1/2 cup celery, diced
2 eggs, hard boiled and diced
salt and pepper to taste
4 hot dog buns or New England style buns
4 lettuce leaves

*For the sweet chili aioli,
combine 2 tablespoons mayonnaise,
2 teaspoons lemon juice, 
1 teaspoon sweet chili sauce
and 1 tablespoon sugar.
Mix well.


This aioli also works well as a salad dressing,
or a condiment for fish.


Grate 1/2 teaspoon lemon rind form the lemon.  
Squeeze lemon to measure 1-1/2 tablespoons juice.
Combine lemon rind, juice, mayonnaise and onion
in a large bowl.
Add shrimp, eggs and celery: toss gently.
Salt and pepper to taste.


Crab rangoon and teriyaki shrimp.


Marinated pork.

Cooked perfectly.

I complemented the chef on a job well done.
But the pork was not well done 
- it was cooked medium -
and that was perfect!

He told me that the pork was marinated in teriyaki sauce.


This is the Habitat for Humanity house 
that was being built across the way. 
They spent just over a week building it 
and it will be moved to its permanent location 
for the proud new homeowners.


The Marching Hundred.


Cheerleaders.


It's a sea of red.

Having fun.


Hair twirling.


I found my husband back here.
I wonder why?


Scottish bagpipers.


Emergency run!

If you've never tailgated, 
you don't know what you are missing.
Go out and support your local sports team,
be it high school, college or pro team.

Even if they lose - again.

Friday, April 29, 2011

April Dessert Wars Challenge -
Vanilla Dreams


This month’s theme was Vanilla Dreams
and we were challenged to use the vanilla beans that we won from Beanilla in our dessert.


The twist this time from Dessert Wars was that we were required to use vanilla in three different ways in our dessert.


The April prize package includes:

Beanilla Sampler Pack of Vanilla Beans
Lenox Personalized Musical Cupcake
1,000 ideas for Decorating Cupcakes, Cookies & Cakes
Organic Valley $50 Gift Certificate
Organic Prairie $50 Gift Certificate
Theme Kitchen $50 Gift Certificate
BEKA Cookware Crepe Pan
Whisk and cupcake necklace from Moon & Star Designs

And a cook book from King Arthur Flour.


At long last, two of the Foodie Girls’ favorite desserts come together.

I have always loved pound cake and the Foodie Daughter is obsessed with vanilla bean ice cream.

In this household, only a fool dares come between her and her vanilla bean ice cream. It’s just that serious. And while I love the richness and flavor of a good pound cake, I’m not quite that territorial. Just in case you are interested, pound cake got that name because older recipes called for a pound of butter, a pound of sugar, a pound of eggs and a pound of flour. Now, that’s one heavy cake!

There are thousands of orchid species in the world and over a hundred thousand hybrids,
but Vanilla planifolia is the only orchid that produces food for humans. The vanilla bean, or pod, comes from the Vanilla orchid. There are over one hundred species of vanilla that are native to the tropics in Africa, Asia and the Americas. The Vanilla orchid grows as a vine that can reach more than 300 feet in its natural habitat.

Historically, workers would have to climb trees or cliff faces, risking serious injury or death in order to harvest the vanilla seed pods. Now, on commercial farms, the Vanilla orchids are grown over large frames in bright sunlight.

After harvest, the seed pods must be cured before they can be used. Curing can take up to nine months. First the seed pods are soaked in hot water before they are spread out on a blanket in the hot midday sun and left out to dry. At night they are rolled up in the blanket, causing the pods to sweat. This process is repeated every day for three to four months or until the pods are cured. This is a labor-intensive process, but this is what helps to develop the complex flavors in the vanilla. And now you know why your vanilla beans are so expensive.

Do yourself a favor and only get the good stuff – the real stuff when it comes to vanilla extract. The imitation vanilla extracts on the market may have been made from wood pulp or even from by products of the coal-mining industry. Yum! Only not.

And here’s a tip for you: once you have split that vanilla bean and extracted the precious seeds, don’t toss the empty bean away. Instead, get a container with a tight-fitting lid and place the bean in it. Then fill the container with granulated sugar. Close the container and mark the container “Vanilla Sugar”. Use this in recipes that require both vanilla and sugar (you can either skip the vanilla or add both to add extra vanilla flavor), and remember to add more sugar to the container each time you use the sugar.


Now, let’s get to the food.
First I made the Vanilla Bean Ice Cream.*

I tweaked a recipe for vanilla ice cream that came with the ice cream maker for this Dessert Wars Challenge.

The recipe:
3 cups Half and Half
¾ cup vanilla sugar
Vanilla seeds from vanilla bean

*The freezer bowl must be placed in the freezer at least 24 hours prior to starting recipe.


In a mixing bowl, mix the Half and Half, the vanilla sugar and the vanilla seeds with a hand mixer on low speed until the sugar is dissolved, about 1 to 2 minutes.


Turn the machine on and carefully pour the mixture into the freezer bowl through the ingredient spout and let the machine churn until the mix is thickened, about 25 – 30 minutes.


Turn off machine and scoop out with a non-metallic spoon into a freezer container. Store in the freezer for at least 2 hours to harden.


Next up was the
Honey Vanilla Pound Cake.

For this I turned to an Ina Garten recipe.

The ingredients are:

2 sticks unsalted butter, at cool room temperature**
1 ¼ cups vanilla sugar
4 large eggs, at room temperature
2 tablespoons honey
Vanilla seeds from one vanilla bean
1 teaspoon grated lemon zest
2 cups sifted cake flour
1 teaspoon kosher salt
½ teaspoon baking powder

**Cool room temperature means that you have allowed the butter to sit out at room temperature for one hour.


Preheat the oven to 350 degrees.
Grease the bottom of a loaf pan and line the bottom with parchment paper. Then grease and flour the pan.

Cream the butter and vanilla sugar with a hand mixer on medium speed for 3 to 4 minutes, or until the mixture is light.


Put the eggs, honey, vanilla seeds and lemon zest in a measuring cup but do not combine. While running the mixer on low speed, add the egg mixture, one egg at a time. Scrape the bowl down and make sure each egg is incorporated before adding the next.


Sift together the flour, salt and baking powder.
Add the flour a little at time with the mixer running on low speed. Finish mixing it in with a spatula to avoid over mixing-the batter.


Pour the batter into the prepared pan and smooth the top. Bake for about 50 to 60 minutes or until a toothpick inserted in the center comes out clean.


Cool for 15 minutes and turn out on a baking rack to cool completely.


And now for the finishing touch:

Vanilla Glaze.

2/3 cup powdered sugar
1 tablespoon Half and Half
½ teaspoon vanilla extract


Mix together and pour over the cooled pound cake.


The Divine Vanilla.


Oh yeah, the Foodie Girls are happy.
Very happy.


Monday, August 3, 2009

Barbecue Beef Brisket at Home
My husband's family has worked out a system to share the hosting duties for holidays and other family get-togethers. As part of that, we have agreed to host the summer get-together and hope for a nice day so that we can enjoy the deck and the kids can play out in the yard and a water balloon fight or two.
Usually, everyone brings a dish or two so that the hostess doesn't have to cook everything, but as we live the farthest away, the others sometimes opt to come over the day before and stay in a hotel. That makes traveling with food a bit more difficult, so I offered to make all the food for the meal to make things easier on them.
Now, to make things easier on myself, I opted to make a dish that needed to be cooked earlier in the week, and then could simply be reheated the day of the party.

I found a lovely beef brisket at our local Sam's Club. The meat man hesitantly warned the Foodie daughter and me that there was a fair amount of fat on a brisket, as apparently he has found that women tend to fear fatty meats. We just looked at one another and said, "flavor!" Not to worry, dear readers, the fat was removed after cooking, but it did its job of basting the meat as it slow-cooked for ten long hours.
I also pulled a cup of homemade beef consomme out of the freezer and my own blend of Memphis BBQ Rub from the spice rack for this first step in making Barbecue Beef Brisket.


Memphis BBQ Rub

1/4 cup paprika

1 tablespoon granulated sugar

1 teaspoon celery seed

1 teaspoon dry mustard

1 teaspoon onion powder

1 tablespoon brown sugar

2 teaspoons salt

1 teaspoon black pepper

1 teaspoon garlic powder

1 to 3 tablespoons cayenne pepper (the more, the hotter the rub)


Two days before the party I got started. I generously coated both sides of the brisket and placed the meat, fat side up, in a slow cooker.
The beef consomme was added and this slow cooked for eight to ten hours.


About half way through, I turned the meat over and allowed it to continue to cook. When it easily tore, I knew it was ready. I took the brisket out, covered it with foil and allowed it to rest and cool for a bit before continuing.


Look at this gorgeous juice. I was not going to let this go to waste. After straining the fat off, I would use the remaining juice for the barbecue sauce for the brisket.


After the meat had cooled enough that I could easily handle it, I pulled it before cutting the long strands into bite-size pieces with my kitchen shears.


The pulled beef had been separated from the fat and was ready for the sauce. That would have to wait for the next day, however as I was quite tired.


I started off with the usual players for the Whiskey Run BBQ Sauce and added that to the meat stock and juices that were happily simmering away on the stove. Since I changed out the recipe, it was necessary to adjust the other ingredients also.* For instance, the balance of sweetness was thrown off, so more brown sugar was needed. In addition, something was missing, a certain umami, and I found that a splash or two of soy sauce rectified that issue. Finally happy with the sauce, I could turn off the heat and let the sauce cool before adding some to the beef in the fridge and bottling the rest.
*As this sauce reduces by about half as it cooks, it is important to wait until the end before tasting and adjusting to taste.


Finally the sauce and the meat meet and can heat in the slow cooker the day of the party.


As I had indicated earlier, the Foodie daughter and I had decided to make things easy on ourselves by making some things ahead and by purchasing some items at the store.
Our favorite deli mustard potato salad and cole slaw were nice sides for the barbecue and required little effort on our part.


Don't you wish you were here?


Really, don't you? This barbecue beef brisket was very good and it got rave reviews.
Fresh fruit from the produce department of the grocery store complemented the delicious homemade brownies that the Foodie daughter made and the Honey Vanilla Pound Cake that I made.

All in all, it was a beautiful and enjoyable day. Hopefully the food was just as good.